APPEARANCE OF EN 10217-1 PIPES
- Weld Seam
The weld area of EN 10217-1 pipe is a critical component that must be free from cracks, lack of fusion, and lack of penetration. Any repairs to the weld seam of EW and HFW tubes are not permitted. Repairs to the weld seam of SAW tubes shall be allowed if done by an agreed documented procedure. This is to ensure the structural integrity of the pipe and to prevent any potential leaks.
- Tube Surface
The EN 10217-1 pipe has specific requirements for its surface to be considered usable. The tube must be free of any external or internal surface defects that can be detected by a visual examination of the surfaces. Additionally, the finish and surface condition should not be such that any surface imperfections would require dressing. However, if it is necessary to dress the surface imperfections, they can only be ground or machined down. The wall thickness in the dressed area must not fall below the specified minimum wall thickness after dressing. Finally, all dressed areas must blend smoothly into the contour of the tube without any visible imperfections.
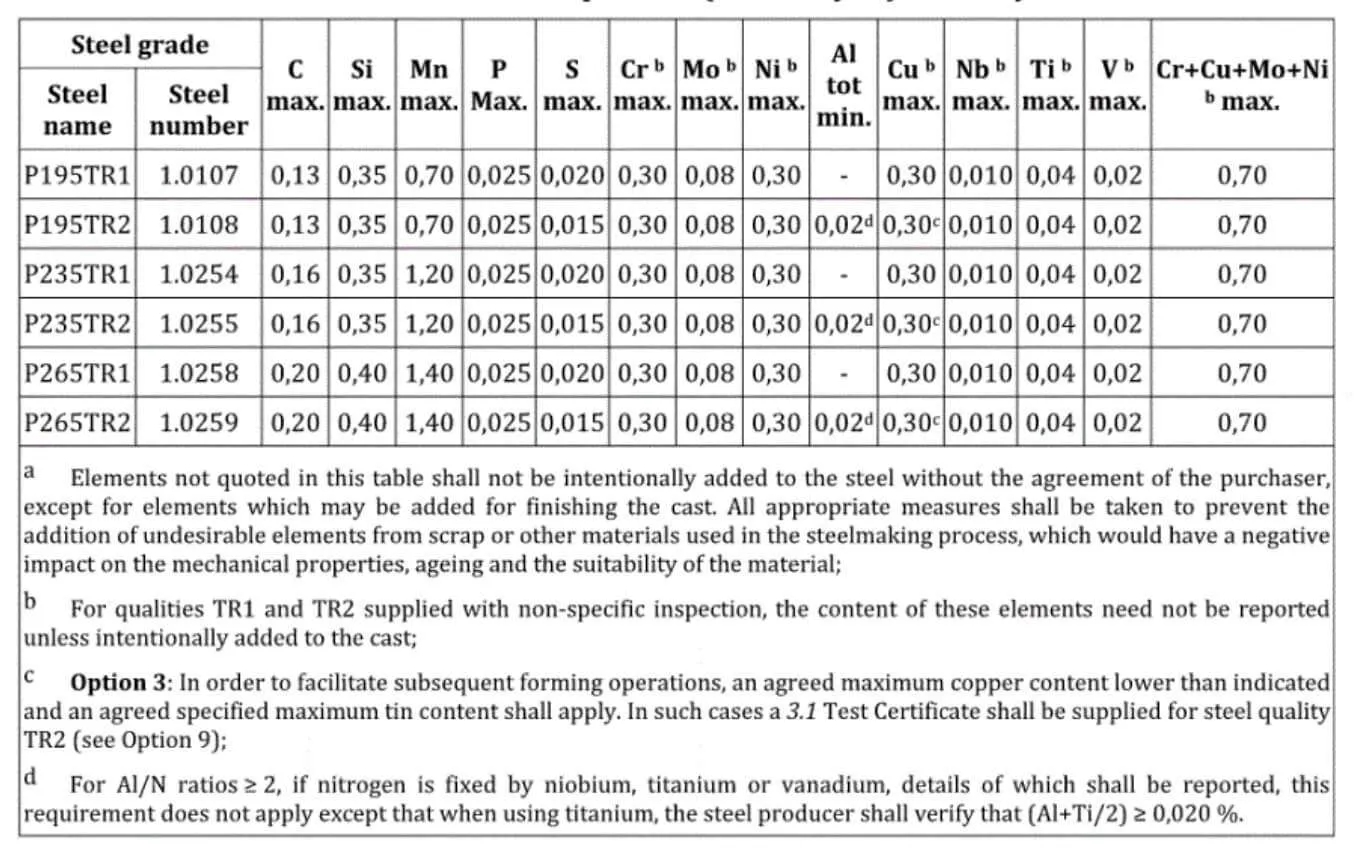
CHEMICAL COMPOSITION FOR EN 10217-1 NON-ALLOY STEEL TUBES
- Chemical Composition

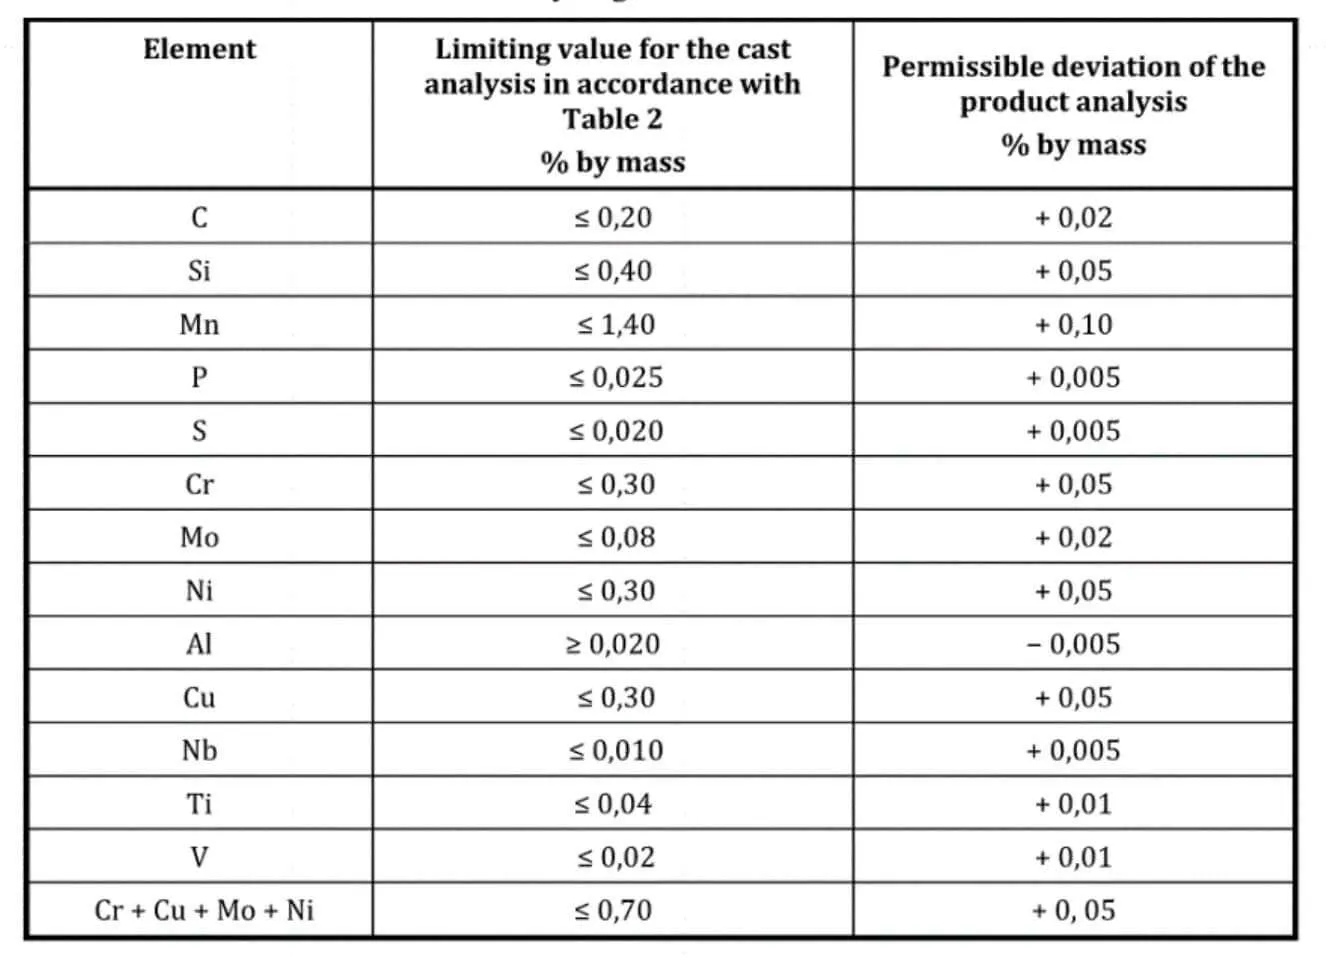
- Permissible Deviations of EN 10217-1 Product Analysis

MECHANICAL PROPERTIES OF EN 1021-7-1 PIPES
| Steel Grades | Tensile Properties | Impact Properties | |||||||
| Steel Name | Steel Number | Upper Yield Strength | Tensile Strength | Elongation |
Minimum Average Absorbed Energy At a temperature of ℃ |
||||
| T≤16 | 16<T≤40 | l | t | ||||||
| Mpa | Mpa | l | t | 0 | -10 | 0 | |||
| P195TR1 | 1.0107 | 195 | 185 | 320-440 | 27 | 25 | – | – | – |
| P195TR2 | 1.0108 | 195 | 185 | 320-440 | 27 | 25 | 40 | 28 | 27 |
| P235TR1 | 1.0254 | 235 | 225 | 360-500 | 25 | 23 | – | – | – |
| P235TR2 | 1.0255 | 235 | 225 | 360-500 | 25 | 23 | 40 | 28 | 27 |
| P265TR1 | 1.0258 | 265 | 255 | 410-570 | 21 | 19 | – | – | – |
| P265TR2 | 1.0259 | 265 | 255 | 410-570 | 21 | 19 | 40 | 28 | 27 |
TOLERANCE OF EN 10217-1 STEEL PIPES
- Outside Diameter and Wall Thickness Tolerance on EN 10217-1
| Outside Diameter | Tolerance on | ||
| Outside Diameter | Wall Thickness | ||
| D | D | T ≤ 5 | 5 < T ≤ 40 |
| D ≤ 219.1 |
±1% or ±0.5 Whichever is the greater |
±10% or ±0.3 Whichever is the greater |
±8% or ±2 Whichever is the greater |
| D > 219.1 | ±0.75% or ±6 Whichever is the greater |
||
- Length Tolerance on EN 10217-1
| Length | Tolerances on Exact Length for Outside Diameter (D) | |
| L | < 406.4 | ≥ 406.4 |
| L ≤ 6000 | +10, 0 | +25, 0 |
| 6000 < L ≤ 12000 | +15, 0 | +50, 0 |
| L > 12000 | + by agreement, 0 | + by agreement, 0 |
MARKING TO BE APPLIED ON EN 10217-1 PIPES
Steel tubes EN 10217-1 are used in numerous industries, from construction and infrastructure to chemical processing and oil & gas. In order to ensure that these products are durable and fit for purpose, manufacturers are required to mark their products with certain essential information. This includes the manufacturer's name or trade mark, the type of tube, the standard number and the steel name or steel number. By law, at least one end of each tube must be marked in this way. This helps to ensure that users can identify the product, check that it is fit for purpose and trace it back to the manufacturer if necessary. As such, it is a vital part of product safety and quality assurance.
For tubes with an outside diameter of over 51mm, the marking on the tube may be replaced by marking on a label or tag which is securely attached to the bundle or box. This label or tag shall also identify the tube diameter, wall thickness and length range. The manufacturer may also include additional markings as needed for identification. This ensures that all tubes can be properly identified and traced back to their manufacturer.
